Assalamualaikum Warahmatullah Wabarakatuh
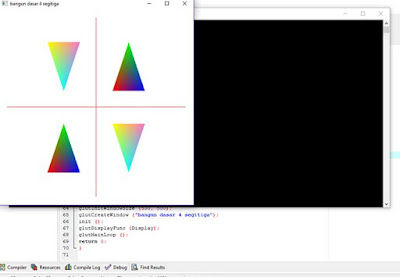
Berikut Tutorial bagaimana cara Membuat Empat Gambar Segitiga Menggunakan Aplikasi Dev C++
1. Buka Aplikasi Dev C++ Yang telah di install
klik File>New> Project
3.
Pilih lokasi project yang akan anda simpan
pilih tab paramater
kemudian di ketik kata berikut
-lopengl32
-lfreeglut
-lglu32
ingat ya, tanda (-) juga di masukkan
#include <GL/glut.h>
#include <windows.h>
void init (void) {
glClearColor (1.0, 1.0, 1.0, 0.0);
glLineWidth (1.0);
glColor3f (1.0, 0.0, 0.0);
glOrtho (-6,6, -6,6, -6,6);
}
void Display (void) {
glClear (GL_COLOR_BUFFER_BIT);
glBegin (GL_LINES);
glVertex2f (-5.5, 0.0);
glColor3f (1.0, 0.0, 0.0);
glVertex2f (5.5, 0.0);
glEnd ();
glBegin (GL_LINES);
glVertex2f (0.0, -5.5);
glColor3f (1.0, 0.0, 0.0);
glVertex2f (0.0, 5.5);
glEnd ();
glBegin (GL_TRIANGLES);
glColor3f (1.0, 0.0, 0.0);
glVertex2f (1.0, 1.0);
glColor3f (0.0, 0.0, 1.0);
glVertex2f (3.0, 1.0);
glColor3f (0.0, 1.0, 0.0);
glVertex2f (2.0, 4.0);
glEnd ();
glBegin (GL_TRIANGLES);
glColor3f (0.0, 1.0, 0.0);
glVertex2f (-2.0, -1.0);
glColor3f (1.0, 0.0, 0.0);
glVertex2f (-3.0, -4.0);
glColor3f (0.0, 0.0, 1.0);
glVertex2f (-1.0, -4.0);
glEnd ();
glBegin (GL_TRIANGLES);
glColor3f (1.0, 1.0, 0.0);
glVertex2f (1.0, -1.0);
glColor3f (0.0, 1.0, 1.0);
glVertex2f (2.0, -4.0);
glColor3f (1.0, 0.43, 0.78);
glVertex2f (3.0, -1.0);
glEnd ();
glBegin (GL_TRIANGLES);
glColor3f (1.0, 0.43, 0.78);
glVertex2f (-1.0, 4.0);
glColor3f (1.0, 1.0, 0.0);
glVertex2f (-3.0, 4.0);
glColor3f (0.0, 1.0, 1.0);
glVertex2f (-2.0, 1.0);
glEnd ();
glutSwapBuffers ();
}
int main (int argc, char** argv) {
glutInit (&argc, argv);
glutInitDisplayMode (GLUT_DOUBLE |
GLUT_RGB);
glutInitWindowPosition (0, 0);
glutInitWindowSize (500, 500);
glutCreateWindow ("bangun dasar 4
segitiga");
init ();
glutDisplayFunc (Display);
glutMainLoop ();
return 0;
}int main (int argc, char** argv) {
glutInit (&argc, argv);
glutInitDisplayMode (GLUT_DOUBLE | GLUT_RGB);
glutInitWindowPosition (0, 0);
glutInitWindowSize (500, 500);
glutCreateWindow ("bangun dasar segitiga");
init ();
glutDisplayFunc (Display);
glutMainLoop ();
return 0;
}
Setelah berhasil anda masukkan
kemudian pilih Execute> Compile & Run
8.Selanjutnya pilih lokasi save as yang akan anda simpan dari hasil project anda
9. Maka Hasil outputnya adalah seperti ini
Semoga bermanfaat


